Your OpenWeb Client Panel: the complete step-by-step guide
Your OpenWeb Client Panel brings your linked services, account information and support together at openweb.co.za/client. Whether you are following a SIM delivery, downloading an invoice, installing a travel eSIM or managing a team's Shared APN connections, this guide shows you where to go and what to do next. Start with signing in, then jump to the section for your service.
Opens your secure OpenWeb login in a new tab. This public guide never asks for your password.
Before you start
- The email address registered with OpenWeb and your Client Panel password, or access to that inbox to reset it.
- A current browser and a reliable internet connection. Connect to Wi-Fi before installing an eSIM.
- Your order or invoice reference if you need help. Never share your password, installation QR code or private payment link publicly.
- Only sections relevant to your linked services and eligibility appear. The screenshots below use demonstration details, not real customer information.
1. Sign in to the OpenWeb Client Panel
Open the correct website
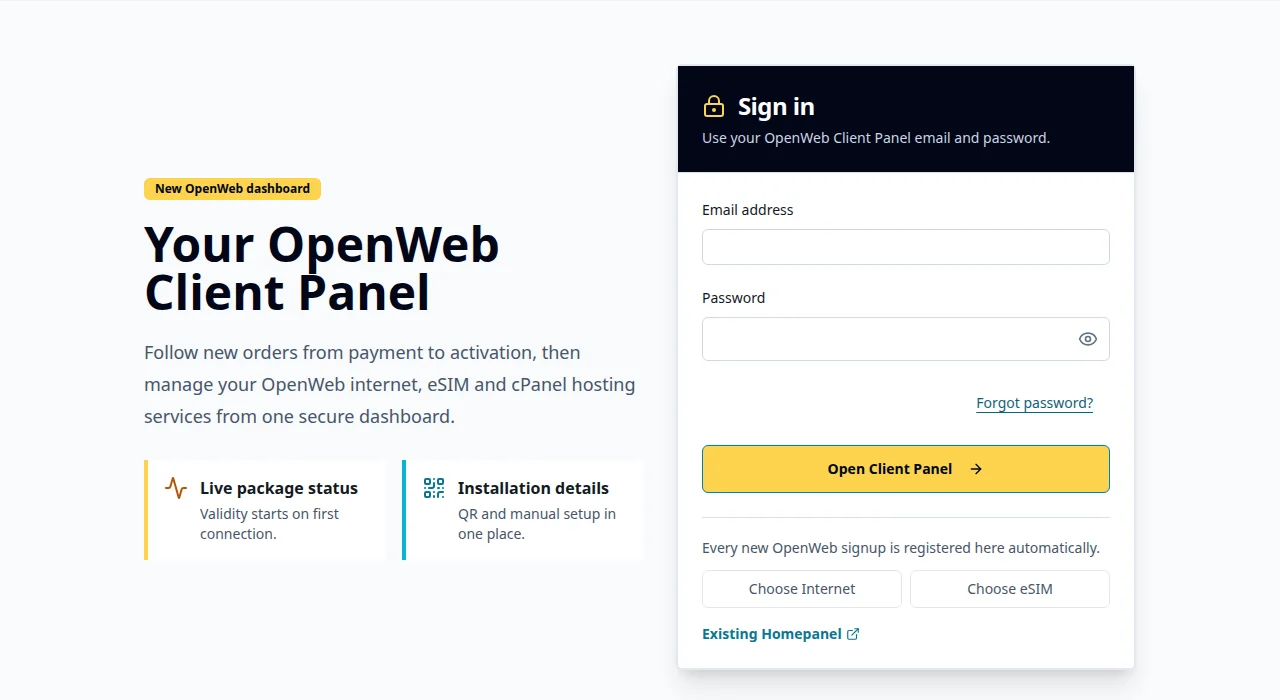
Visit https://openweb.co.za/client or choose Client Panel from the website's Login menu. Check that the address belongs to OpenWeb before entering your details. The Client Panel is your customer account, not your router's settings page or your hosting control panel.
Enter your registered email and password
Type your email address into Email address, then enter Password. Use the eye icon to check the password if you are somewhere private; select it again to hide the characters. Your Wi-Fi password and SIM PIN are different credentials.
Select Open Client Panel
Wait for your account to load. New website signups are registered automatically; use your account invitation to create a password if you have not set one. Do not place another order just to recover access to an existing service.
Complete any required profile check
An imported profile may need your name, contact number, ID or passport number and address before the dashboard opens. If asked to correct a failed email address, provide an inbox you control and follow the displayed instructions. These checks protect account ownership and keep order communications accurate.
2. Recover a forgotten password safely
Choose Forgot password?
On the login form, select Forgot password? and enter your registered email. Submit the recovery request once. For privacy, the response does not reveal whether a particular email has an account.
Open the recovery email
Check your inbox and junk folder. Use the private reset link in the email; it expires after one hour and works only once. A reset link is as sensitive as your password, so do not forward it or include it in a support screenshot.
Set a new password and return to login
Follow the password and confirmation prompts, then sign in again. Use a unique password and keep access to your registered inbox secure. If you cannot access that inbox, contact OpenWeb for an ownership check rather than creating a duplicate profile.
3. Find your way around the dashboard
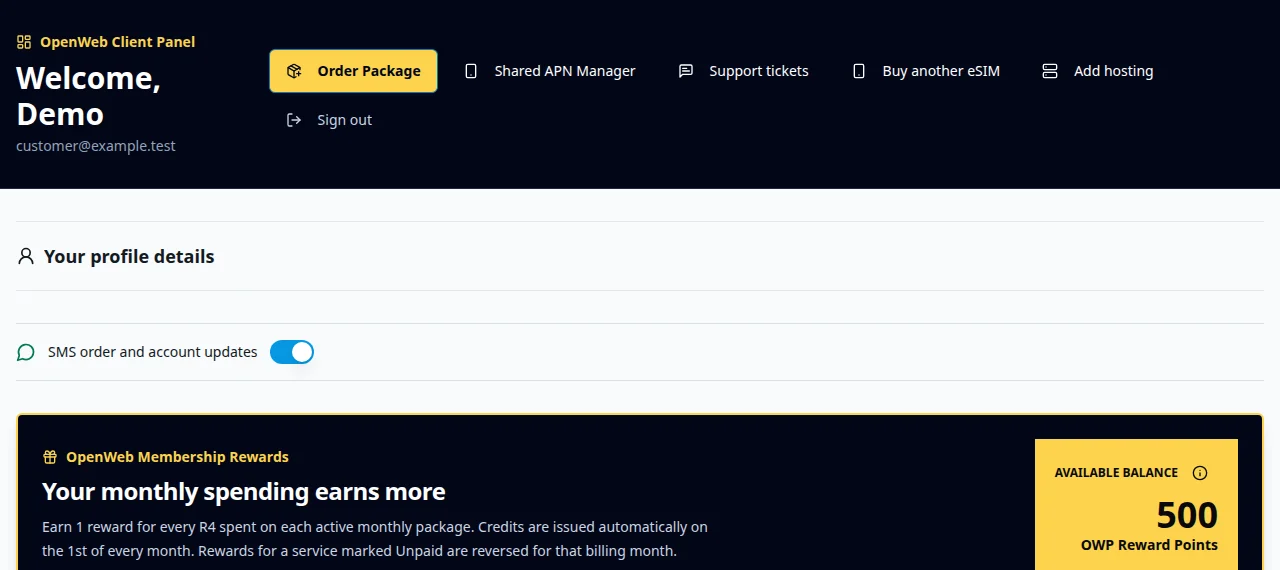
The welcome area contains shortcuts for Order Package, Shared APN Manager, Support tickets, Buy another eSIM and Add hosting. On a phone, these controls wrap onto additional rows; scroll down to see the service sections. You do not need a separate mobile app to use the panel.
Expand Your profile details to check the information OpenWeb has on file. Additional services may appear below it. Contact support if a saved detail needs correction and no edit control is offered; the profile display is not a general-purpose editing form.
The order and account updates switch controls optional mobile notices. Its label shows the delivery channel configured for your account. Essential email and payment communications are separate. Sign out when finished, especially on a shared device.
A missing service card does not mean the service has been cancelled. It may still require an ownership link or migration check. Tell support the relevant order, domain or SIM reference privately; do not reorder or pay again to make a card appear.
4. Follow internet, voice and Fibre orders
Find Your OpenWeb service orders
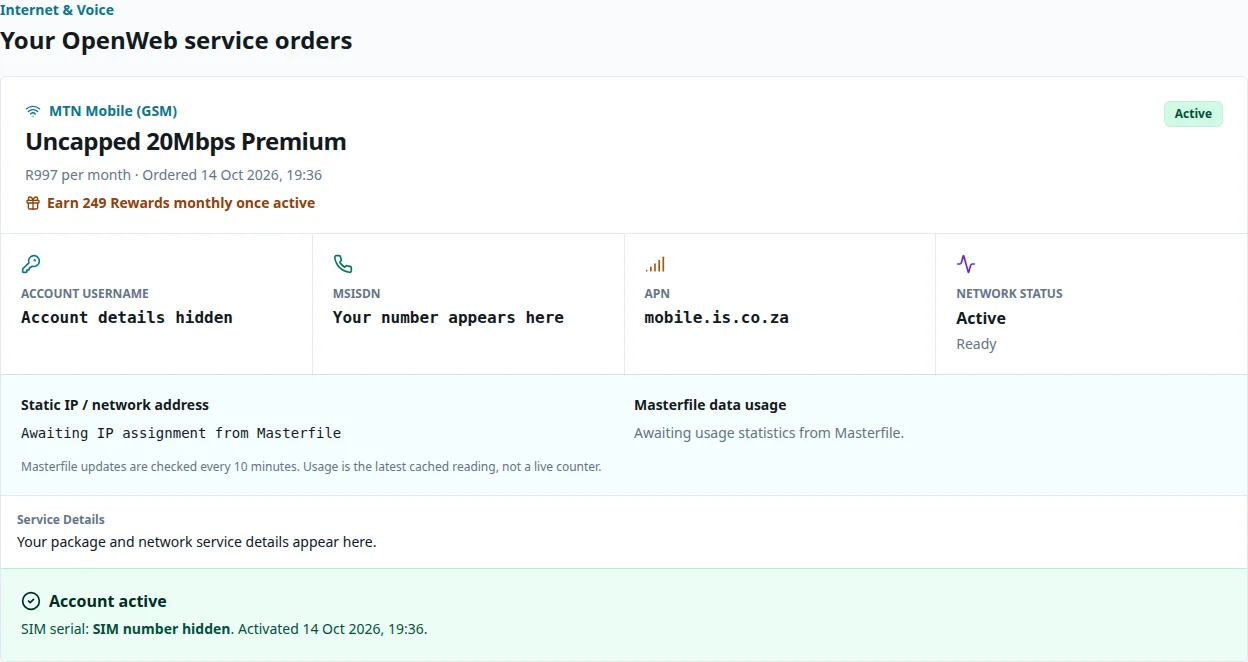
Locate the card for your package. Check the category, product, monthly amount and any itemised extras. The status badge explains the current stage; payment follow-up is not the same as confirmed payment or network activation.
Read the payment and activation state
After verified payment, a network order can show Paid - Awaiting SIM Activation, while Fibre awaits Fibre activation. Staff still need to complete the appropriate setup. A payment review means OpenWeb is checking the provider result: do not pay a second time while that review is open.
Use the account details supplied for your SIM
After setup, the card can show Account Username, MSISDN, APN, Network Status and SIM serial. MSISDN means the mobile number assigned to the SIM. Enter your own card's APN into your device; do not borrow settings from a different OpenWeb product.
Check delivery and available usage
When a shipment is assigned, SIM delivery shows the courier, tracking reference and latest status. Copy tracking helps you keep the reference. Eligible MTN Mobile and Telkom Direct services display the latest available usage or network readings. These are cached provider readings, not an instantaneous counter; ordinary Telkom services may not provide usage statistics.
5. Pay the correct order or outstanding balance
Where your account has a recorded later unpaid debit, Debit Order Unpaid shows the billing period, package and recovery amount with Pay with Netcash. Your service payments may also show outstanding provider-linked billing. Read the exact account and period before using either control, and contact support if you believe it has already been settled.
Check the period and itemised amount
Use the secure Pay Now button in your OpenWeb payment email or the payment control shown for the relevant service or invoice. Confirm the package, billing period, extras and total before proceeding. A Shared APN wallet topup is not a payment against a hosting invoice.
Open the private payment page
For standard network orders and new hosting invoices, the OpenWeb Pay Now page displays the server-set amount and takes you to Netcash's supported payment methods. You cannot edit an issued account payment into a different amount. Available methods are determined by the payment provider.
Complete payment once
Follow the provider's instructions and keep the receipt or reference. Returning to a success page is not itself proof that payment has been verified. If the page says confirmation is in progress, allow the result to update and contact support if it remains unresolved.
Check the updated account status
The payment status changes after secure confirmation. If you paid by EFT, supply proof of payment as instructed so staff can reconcile it. Include your first and last name and the relevant reference. Never send card details, online banking passwords or an OTP to support.
6. View and download invoice PDFs
Find All current invoices
Scroll to All current invoices for the invoice number, amount, due date and payment state. Use the previous and next controls if there are more than 20 invoices. An invoice can also appear inside its related hosting service card.
Choose View PDF or Download PDF
View PDF opens the invoice for reading; Download PDF saves a copy using your browser. If a new tab does not open, check the browser's pop-up controls. These are private documents: stay signed in and do not share their account links publicly.
Look for Historical hosting invoices
Migrated customers can have a separate section containing original historical invoices preserved as PDF records. Downloading one does not raise another charge. Contact support if an expected historic document is missing rather than assuming the debt or payment has disappeared.
Pay from the relevant unpaid invoice
Use Pay now beside the outstanding invoice in its service or domain area, where available. Check the due date and service coverage. Hosting services with different due dates can have separate invoices, and annual domain renewals are not the same as a monthly hosting charge.

7. Open cPanel or DirectAdmin and manage hosting
Choose the correct website
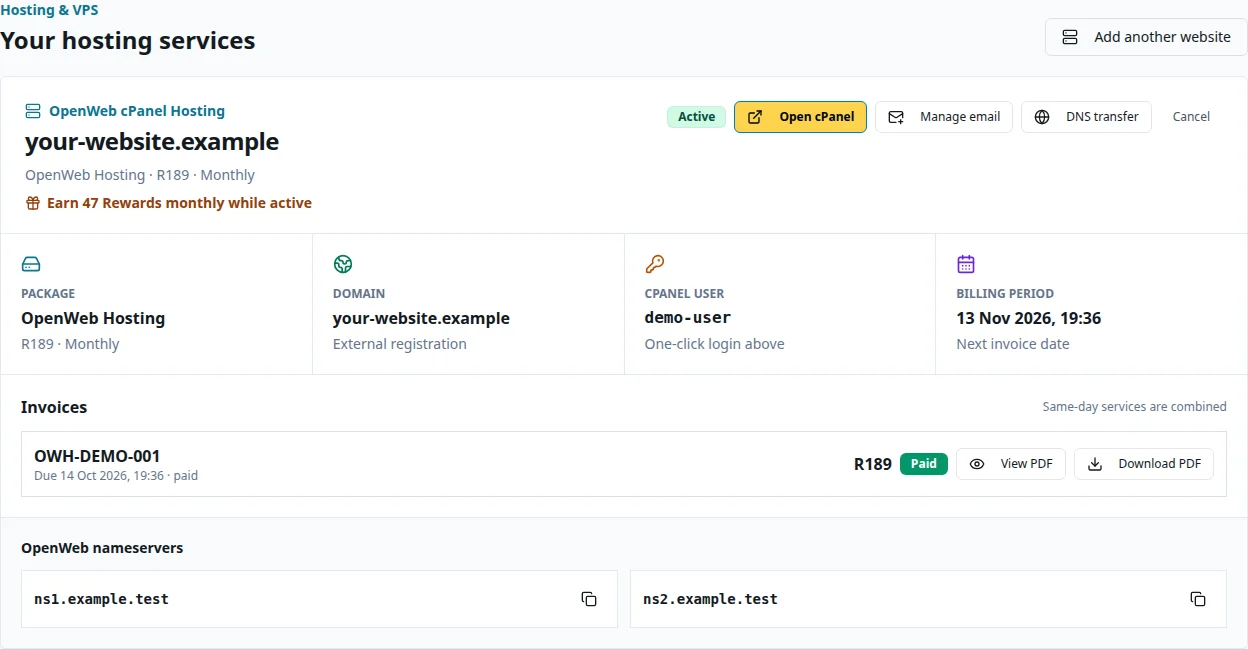
Under Your hosting services, find the domain you want to manage. Review the package, billing date, service state and control-panel username. Actions depend on the server, service type and activation state. A managed VPS is not presented as an ordinary shared-hosting account.
Use the one-click control-panel login
For an active linked cPanel service, select Open cPanel. For a DirectAdmin service, choose Open DirectAdmin. A secure session opens the correct hosting control panel without asking you to retype a separate hosting password. Allow the new tab and keep that session private.
Create and maintain cPanel email addresses
Select Manage email on a cPanel service. Enter the mailbox name, password and quota requested by the form, then create the address. Existing mailbox controls allow supported password, quota and deletion operations. Check the address carefully before deleting: mailbox deletion is not a reversible way to stop new mail.
Use DirectAdmin tools when available
Open DirectAdmin tools to access Tools, Email, FTP users and Files. You can create or update mailboxes and FTP users, browse folders and use Edit & upload to continue in DirectAdmin. The Tools shortcuts cover functions such as databases, DNS, SSL, backups, domains and scheduled tasks where the server permits them. Do not change files or DNS you do not recognize.
Review billing or cancellation controls
Some legacy services show Update card or Set up recurring billing for their existing provider. Read the consent first; not every hosting service uses that flow. Cancel opens the service's cancellation process. If cancellation is scheduled, check the displayed end date; Keep active is offered where the service can still be resumed. For a disputed invoice, contact support before cancelling.
8. Check domains, renewals and DNS transfers
Open Your domains
Check each domain's status, annual renewal amount, renewal date and next invoice. A registrar link awaiting review or a billing hold needs support attention. A free renewal applies only while the linked hosting meets the paid and active eligibility shown on the card.
Review Automatic annual renewal
Use the domain's renewal setting only after reading its terms. Turning it off stops future OpenWeb renewal collections; it does not reverse a payment already processing. Some legacy domain payment paths request separate PayFast recurring-card authorization. Follow the specific invoice's instructions.
Prepare a DNS transfer carefully
On a supported cPanel service, select DNS transfer and choose your current DNS provider to read its guide. A complete BIND zone export is preferable. Without one, public discovery finds common records only and may miss hidden subdomains or custom DKIM records used by email.
Preview before confirming
Review all proposed additions, replacements and warnings. Check website, email, verification and other service records against your current zone. Only confirm when the details are correct and you have authority to change them. Follow the nameserver checklist afterwards. DNS import does not copy website files or mailboxes and is not, on its own, a registrar transfer.
9. Install and manage your eSIM Ultra
Find the eSIM card
Locate the purchased eSIM, then choose Overview, Install or Details. Overview shows available usage and activation or expiry information when supplied by the network. Refresh requests an updated reading; it does not buy another package.
Connect to reliable Wi-Fi first
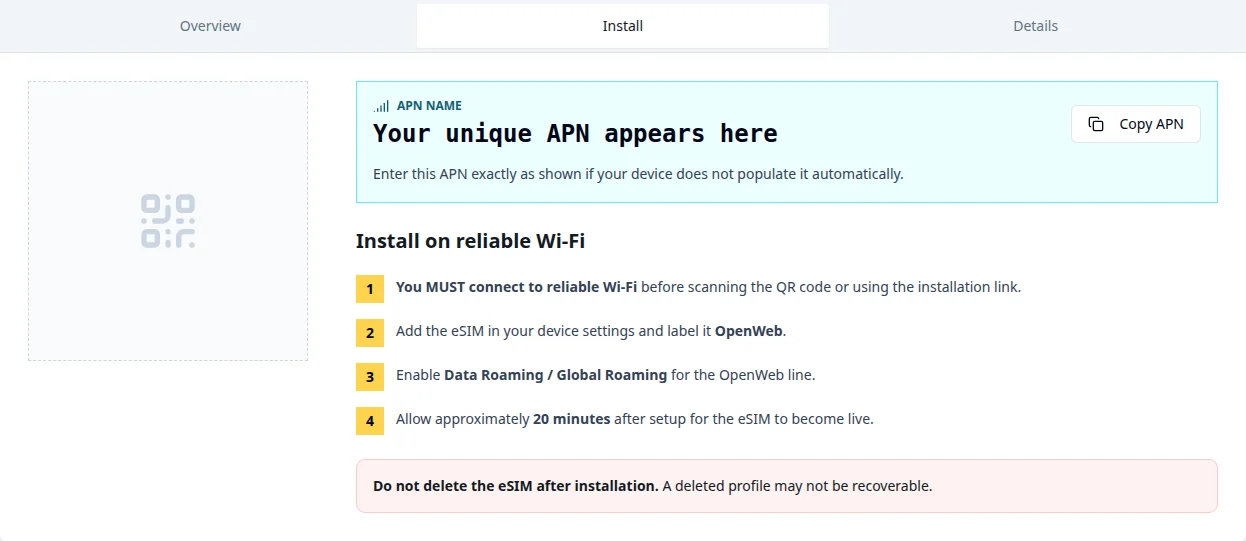
Before installation, confirm that your exact device model supports eSIM and is unlocked. Keep Wi-Fi connected while scanning the QR code or following the installation link. If the QR is on the same phone, use another screen or the manual installation details as your device permits.
Follow the instructions for this specific SIM
Open Install. Use View eSIM Details and the private access code if the setup portal is available. Follow its device-specific QR or manual steps. Details contains the supplied ICCID, SM-DP+ address, activation code and LPA information. Never post those credentials publicly or install one profile on multiple devices.
Select the OpenWeb data line and enable roaming
Enable Data Roaming or Global Roaming for the OpenWeb eSIM. Use the exact APN shown on your own Install tab; select Copy APN if you need to enter it manually. Allow approximately 20 minutes after configuration for connectivity. Check the selected mobile-data line so you do not unintentionally use another provider's roaming data.
Keep the installed profile
Do not delete the eSIM to troubleshoot a temporary connection issue. Deleting the profile can cancel access and require a new purchase. eSIM Ultra package validity normally starts on its first supported network connection, subject to the purchased plan's activation policy; this differs from Shared APN's Start button.
10. Buy a compatible eSIM Ultra topup
Select Topup on the correct eSIM
Choose the existing eSIM you want to extend, not a new profile. The panel asks for topups compatible with that specific SIM. A suspended or removed SIM cannot be topped up through that control.
Compare the available options
Check the data amount, validity, price and any voice or SMS allowance. Availability varies: some eSIMs have no compatible topups. Do not assume that a different country's package or a Shared APN topup can be added to this SIM.
Confirm and complete the secure checkout
Follow the offered payment flow, then return to the panel. Wait for payment verification and topup provisioning. Read the refreshed status before trying again if confirmation is still pending. Use Buy another eSIM only when you actually want a separate eSIM purchase.
11. Create a Global Shared APN group and start access
Shared APN Manager is a separate workspace for OpenWeb's global data-only eSIM groups. It is not the Local Shared APN voice/SMS product. A group lets eligible devices share paid access; coverage and the device's eSIM compatibility still apply. Use the supported-country page before arranging travel.
Open Shared APN Manager
Use the dashboard shortcut. The Credit Wallet is at the top, with the available plans and your named groups below. Create a group, give it a recognizable name and select a plan. Creating a draft alone does not mean that access has been purchased.
Choose a bundle and payment method
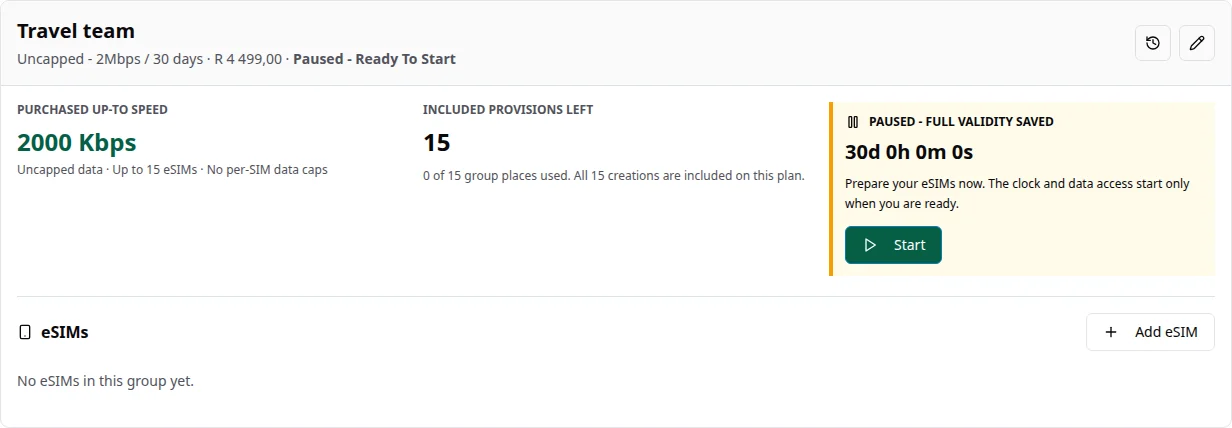
Compare standard allowance, trial and fixed-speed Uncapped plans. The Uncapped - 2Mbps plan supports up to 15 eSIMs; the other Uncapped plans have their own limits. Read the displayed speed, included creations and renewal terms. Choose wallet credit or Netcash Pay Now and confirm the quoted total. Eligible plans allow one, two or three consecutive prepaid terms.
Keep a new paid bundle Paused until ready
New paid bundles show Paused - full validity saved. Payment reserves the entitlement; the full countdown is waiting for Start. You can prepare eSIM profiles or order hardware without starting that new bundle. This is different from pausing an individual SIM after the bundle has begun.
Press Start when your team is ready
Read the confirmation and select Start bundle. The first term begins then: ordinarily 30 days, or seven days for a trial. Prepaid future terms follow consecutively. Start does not charge the same purchase again, and pausing an individual connection later does not rewind or freeze an active term.
12. Top up the Shared APN Credit Wallet
Choose Topup beside Credit Wallet
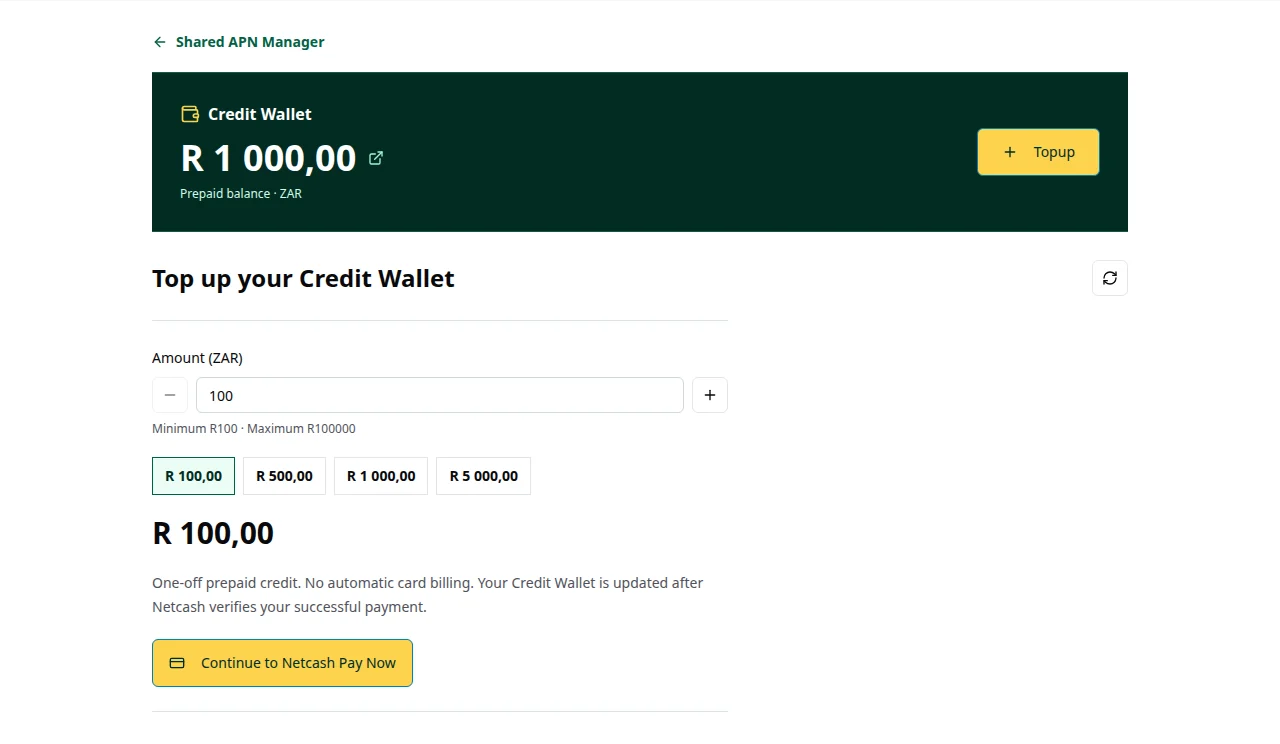
Open the wallet from Shared APN Manager. Choose a preset or enter an amount from R100 to R100000. This is prepaid credit for supported Shared APN purchases and fees, not OWP points or a hardware deposit.
Continue to Netcash Pay Now
Check the amount and complete the secure payment. The wallet is credited after Netcash verifies success. A browser return or an abandoned payment does not add spendable credit. Do not make a duplicate payment merely because confirmation has not yet appeared.
Review the transaction history
Select the wallet balance to open its detailed transaction window. It records credits, purchases and other supported deductions with the amount and balance after each entry. Use Older transactions where offered and retain the reference if you need assistance.
Keep sufficient renewal credit
Where you have agreed to wallet renewals, leave enough credit for the bundle, paid slots and any recurring Plastic SIM charges. Check the renewal settings and price rather than assuming that buying hardware pays future data fees. Wallet topups themselves are once-off payments, not automatic card billing.
13. Add eSIMs, order routers and manage connections
Select Add eSIM on your group
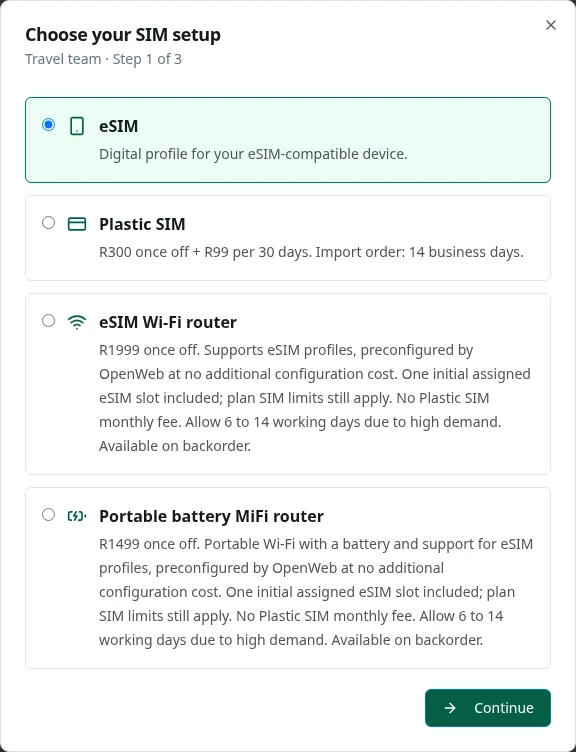
Choose a direct eSIM, a specialised Plastic SIM, an eSIM Wi-Fi router or a portable battery MiFi router. The wizard lists the price and lead time. Wi-Fi routers are R1999 each and portable MiFi routers R1499 each; OpenWeb pre-configures the profile free. Allow 6-14 working days due to high demand.
Label the connection and supply delivery details
Choose a label that identifies the employee or device without exposing sensitive information. Hardware orders require a recipient, delivery address and contact number. Plastic SIMs have separate once-off and recurring wallet charges; review the actual wizard and stock or backorder notice before consenting.
Check slots and confirm the charges
On standard allowance plans, Included Provisions counts the free eSIM creations you have left, not the total group capacity. The first five are once per new client. Additional slots are R35 per term and align with the paid bundle's expiry. A purchased router includes one assigned initial slot across the initial prepaid period, preserving those five free creations; standard slot renewals thereafter are R35 per term. Hardware does not bypass fixed Uncapped or trial SIM limits.
Install or manage the connection
Use the SIM's installation control for its private QR or manual details. On plans that permit it, edit the label, allowance cap and supported speed setting. Uncapped plans have fixed purchased up-to speeds and no per-SIM cap controls. The 512k-labelled plan uses the provider's supported 500 Kbps rate. Pause or resume controls affect a connection, not the bundle's elapsed validity.
Treat removal as permanent
Read removal and termination confirmations before submitting. A removed eSIM is not a spare profile that can safely be reinstalled later. If a renewal remains unpaid, the group can be suspended and, after three days, its eSIMs permanently terminated. Restoring service then requires a new group and profiles under the applicable slot terms.
14. Understand Shared APN usage, alerts and topups
Standard allowance bundles use charge-derived allowance deductions. A GB-labelled allowance is not a promise of identical physical downloaded GB in every destination. Provider charges, the purchased bundle and applicable deduction rules determine how much allowance is consumed. The group transaction log shows the recorded usage adjustments; it does not identify a live country or network when that information is not supplied.
Provider usage can arrive 10-15 minutes later or longer. Individual caps are useful management controls, not instantaneous hard stops. Check both the group balance and transaction history, especially during travel. Fixed-speed Uncapped plans instead have no data cutoff during their paid term, subject to their purchased speed and SIM limit.
Open Usage transactions on your group
Use the history icon and review the dated deductions and adjustments. Keep the group and SIM label handy if a reading needs investigation. The log is the place to reconcile recorded allowance changes, rather than comparing the balance with a phone's physical byte counter as if they were identical measures.
Act on allowance and expiry alerts
Eligible allowance groups receive notifications at 50% and 90% usage, on depletion and around expiry. Check that your contact email is correct. Read an alert promptly; a sent email cannot guarantee that someone has seen it or that a delayed provider reading will leave the exact same balance.
Buy a topup when appropriate
Select the group's data topup control and compare the available options. Main-bundle allowance is used first; an unexpired topup follows. Topups expire 30 days from their own purchase even while waiting to be used. They do not roll over or inherit the new-bundle Paused-before-Start timing.
Plan the next paid term
Review the group's expiry, prepaid terms and renewal choice. Expired allowance does not carry over. Keep wallet funding current if you enabled renewal, or follow the purchase flow for the next term before the suspension and termination deadlines.
15. Track OWP Reward Points and redeem gifts
Find OpenWeb Membership Rewards
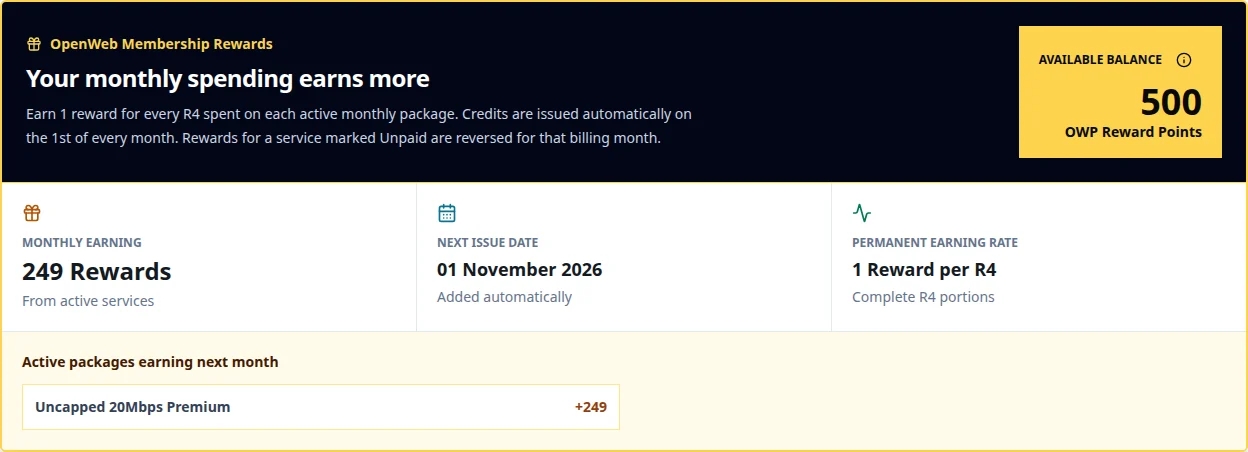
The highlighted balance shows available OWP Reward Points, monthly earning, eligible active packages and the next issue date. The information icon explains the programme. OWP are loyalty points, not cryptocurrency or a cash wallet.
Check monthly earning and history
Eligible active monthly spend earns one point for each complete R4, credited on the first of the month. Reward history records additions and adjustments. If a service is marked Unpaid, only that service's rewards for the unpaid month are reversed. An adjustment can make the balance negative if those points were already spent.
Choose an available reward
Under Rewards & gifts, eligible Netflix, Gemini Pro and YouTube Premium rewards cost 100 OWP for 30 days. Review the named round, stock, eligibility and confirmation before redeeming. These rewards have no cash checkout. Included package gifts are separate and can have their own 31-day duration.
Follow the private redemption instructions
For Netflix, visit the assigned third-party URL and use the redemption key supplied. For Gemini Pro, copy the assigned URL into the browser session signed in to the Gmail account you want to upgrade. YouTube rewards use their supplied URL. Confirm I have redeemed this gift only after successful redemption so the appropriate access period starts correctly.
Check stock and expiry states
Awaiting stock means your claim is saved but access has not started. Eligible waiting-stock point claims can be cancelled with the displayed refund action. Do not share or recycle assigned links or keys. A redeemed or expired round cannot be claimed again just by refreshing the page.
16. Manage eligible entertainment and historical hardware
Qualifying MTN Mobile services can show Your entertainment bundle for Netflix and Cyberghost VPN. Select Claim Netflix and VPN when offered. Staff supply the access items together; the complimentary 30 days begin when that access is provided, not merely when the SIM order is paid. Open the setup instructions for supported downloads and use only your assigned Netflix profile.
The countdown shows the remaining access period. Where offered, Add / renew bundle requests the combined R299/month add-on. Read the consent: continuing collections use the separate debit-order system rather than automatically charging a saved card through this screen. This is distinct from a 100-OWP reward redemption.
Some customers with historical equipment agreements have Deposit, Cash or Hardware Deposit records showing contract dates, delivery information and cancellation or return progress. These appear only for relevant existing agreements. A deposit is not automatically available to spend as Shared APN credit; refunds and transfers depend on the original agreement and staff confirmation.
17. Open, find and reply to support tickets
Open Support tickets
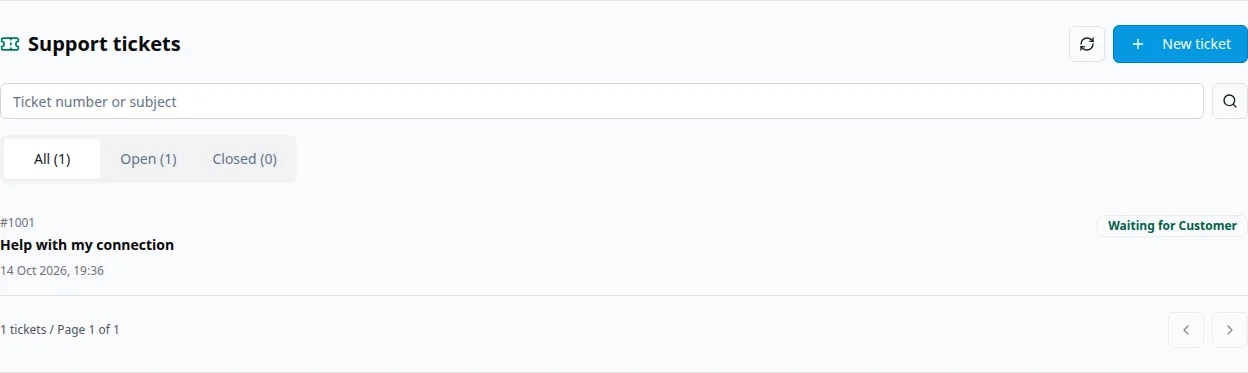
Use the shortcut at the top of the dashboard or scroll to the Support tickets section. Choose All, Open or Closed, search by ticket number or subject, and use page controls to reach older conversations. Refresh tickets requests an updated list.
Create a new ticket
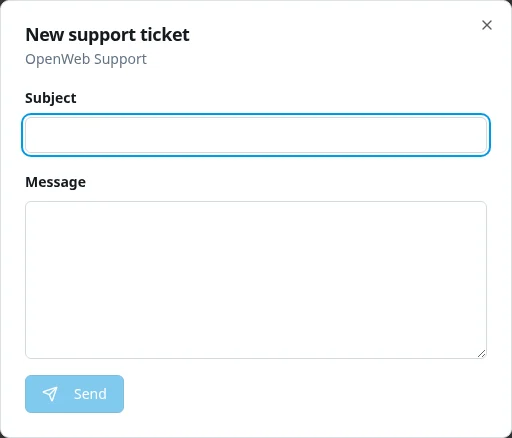
Select New ticket, enter a clear subject and describe the problem. Include the affected service, the approximate time and the troubleshooting already attempted. Never include a password, OTP, card information or a public copy of an installation QR code. Select Send once and keep the returned ticket number.
Read the conversation and reply
Open the relevant ticket to view its public messages and available attachments. Add your reply in the same conversation so the team can see the context. All tickets returns to the list. Private internal staff notes are not part of your customer conversation.
Check an interrupted send before repeating it
If the connection drops after submission, follow Check request when offered rather than opening several duplicate tickets. Keep the displayed request reference for support. If you cannot log in at all, use the public OpenWeb support page instead.
18. Write a useful support request
A concise description helps the team act quickly. For example: identify which SIM or website is affected, explain what you expected, state what happened instead and give the time of the last failed attempt. Share sensitive references only inside the authenticated ticket or directly with support. Do not send another payment while an existing payment is being checked.
19. Order another package with your existing profile
Select Order Package
Choose the product category and an available package. Review the current price and included features rather than relying on an old screenshot. Hosting and Global Roaming eSIM also have their own shortcuts.
Check your prefilled details
An existing-client network signup reuses eligible saved information to reduce typing. Confirm the details are still accurate and choose any extras deliberately. You still need to complete the new debit-order mandate and electronic signature where the product requires them.
Read the payable-today and recurring amounts
The quote distinguishes the base account, full-price monthly extras and once-off items. Check the billing month and next debit date. Hosting, eSIM Ultra and Global Shared APN each use their own checkout and validity rules, so do not assume the network pro-rata policy applies to them.
Submit once and follow the new order
Keep the confirmation and check the new service order in your panel. Payment, coverage approval where needed and activation remain separate steps. Buying another package does not automatically cancel your existing one.
20. Mobile tips, privacy and common problems
On a phone or tablet, use an up-to-date browser, scroll through stacked service cards and tap the relevant tabs. For a screenshot that is too small to read, select it in this guide to open the full image. On your own account, be mindful of what is visible before taking a screenshot to share.
If the page looks old after an update, refresh it or open a fresh tab. If a section says it is temporarily unavailable, use its refresh or retry control instead of starting a new order. Check another website to distinguish a general connection problem from an account-specific issue.
For payment uncertainty, retain the original reference and contact support before paying again. For a missing service or ownership warning, give staff the relevant identifiers privately. Never attempt to link someone else's SIM just because you know its number.
Do not publish QR codes, access codes, payment links, passwords, ID numbers, complete invoices or private ticket attachments. Keep your email inbox secure and always sign out on shared devices. The generated cover is an illustration; the screenshots below it show the actual interface with synthetic demonstration information. Screens and available actions can change as the panel develops.
Common questions
Where do I log in to OpenWeb?
Use https://openweb.co.za/client and your registered email and Client Panel password. Select Forgot password? if you need a private recovery link. Your router and hosting control-panel credentials are separate.
Why has my payment not activated the SIM immediately?
Payment must first be securely verified. Network provisioning, courier assignment or Fibre installation may still be required. Paid - Awaiting Activation is different from Active. Contact support with your payment reference before trying to pay again.
Can I download all my invoices?
Current invoices have View PDF and Download PDF controls. Migrated records appear separately under Historical hosting invoices where available. Use pagination for older current invoices, or ask support about a missing record.
Is the Credit Wallet the same as OWP points?
No. Shared APN Credit Wallet is prepaid rand credit for supported Shared APN purchases. OWP are loyalty points used for eligible rewards. Equipment deposits are a separate balance governed by their original agreement.
Does a paused Shared APN bundle expire while I wait for hardware?
A new bundle showing Paused - full validity saved waits for Start before its first term begins. Once started, its term runs normally; pausing a SIM does not stop that clock. Data topups have their own purchase-based expiry.
Can I use one eSIM QR code on several devices?
Do not assume so. Each device generally needs its own provisioned profile. A Shared APN group can contain multiple permitted profiles, but it does not make an individual installation QR reusable. Follow the instructions for the purchased SIM.
What if I cannot find a feature in this guide?
Features depend on your linked service, payment state, provider support and eligibility. Contact OpenWeb support if a service is missing or an action should be available; do not create a duplicate order to resolve it.
Official sources & further help
Based on the OpenWeb Client Panel reviewed on 14 October 2026. Screenshots use synthetic demonstration information, not real customer records. Available features depend on your service and account state.